ShopDreamUp AI ArtDreamUp
Deviation Actions


Suggested Deviants


Suggested Collections


You Might Like…


Description
After much deliberation and internal fighting, I decided to give this pattern to the masses.
<3 Enjoy.
Link to finished plush~ [link]
Sorryfor how quite it is. My video mic did not want to co-operate.
Crochet Togepi Pattern
Translated by Taikxo
Materials:
White worsted weight yarn
Tan worsted weight yarn
Small amount of black yarn
Small amount of red yarn (or red felt)
Small amount of blue yarn (or blue felt)
Small amount of black felt (optional for eyes)
Small amount of peach yarn (or peach felt)
Yarn needle
Stuffing
The number on the left refers to round, or row when applicable. The number at the end of each set of instructions is the total number of stitches at the end of the row.
Using a tan colored yarn.
Arms, Make 2.
Start with a magic ring.
1: 4sc in magic ring. (4)
2: inc in each stitch around. (8)
3: sc around. (8)
4: *inc, sc in next* around. (12)
Body.
Using white.
Start with magic ring.
1: 6 sc in magic ring. (6)
2: inc around (12)
3: *inc, sc in next* around (18)
4: *inc, sc in next 2 sc* around (24)
5: sc in next 2, *inc in next, sc in next 3* 6 times, sc in last stitch. (30)
6: *sc in next 4, inc* around (36)
7: *inc, sc in next 5* around. (42)
8: sc in next 2 *inc, sc in next 6* around, sc in last 4 sc. (48)
9: sc in next 4 *inc, sc in next 7* around, sc in last 3 sc. (54)
10: sc around. (54)
11: sc in next 6, *inc, sc in next 8* around, sc in last 2. (60)
12-17: sc around. (60)
18: *sc in next 13, dec* around (56)
19: *sc in next 5, dec* around (48)
Change to tan
20: Working in Back Loops Only, sc around. (48) Bind off.
Edging:
Using white, join yarn at the end of row 19.
Work in Front Loops Only.
Work 3 “cluster A”s, then work 1 “Cluster B”, then work the rest of the row in “Cluster A”
“Cluster A”
Slip Stitch in next sc, sc in next sc, hdc in next sc, *dc chain 1, dc* in next stitch, hdc in next sc, sc in next sc.
“Cluster B”
Slip stitch in next sc, chain 1, hdc in next stitch, chain 1, slip stitch in chain, hdc in next sc, *hdc chain 1, slip stitch in chain, hdc* in next sc, hdc in next sc, chain 1, slip stitch in chain, hdc in next sc, chain 1.
Stuff as much as possible.
Feet
Using Tan, make 2.
Start with Magic Circle.
1: 6 sc in magic ring. (6)
2: *sc in next, inc in next, sc in next* around. (8)
3: sc in next 2 sc, inc, sc in next 3 sc, inc, sc in last sc. (10)
4: sc in next 3 sc, inc, sc in next 4, inc, sc in last sc. (12)
5-7: sc around. (12)
Begin stuffing
8: dec around. (6)
Bind off and add any more stuffing needed to fill out shape.
Now, from hear on out, it gets very tricky and confusing. So read the pattern carefully!
Crown Points.
Using tan, make 5.
On the 5th one, DO NOT BIND OFF.
Start with a magic circle.
1: 6sc in magic circle. (6)
2: sc in next, inc, sc in next 2, inc, sc in last sc. (8)
3: sc in next 2 sc, inc, sc in next 3 sc, inc, sc in last sc. (10)
4: sc in next 3 sc, inc, sc in next 4 sc, inc, sc in last sc. (12)
5: sc in next 4 sc, inc, sc in next 5 sc, inc, sc in last sc. (14)
6: sc in next 5 sc, inc, sc in next 6 sc, inc, sc in last sc. (16)
Bind off leaving a few inches of yarn to sew holes together.
Stuff.
DOUBLE CHECK AND COUNT HOW MANY STITCHES ARE IN EACH POINT.
There MUST be 16.
Crown of the head.
Sc in next 8 sc.
*sc in first 8 sc of point* 4 more times. You want to leave the long end close to where the points meet. There WILL be holes there, and you need to sew them up.
(40)
2: *sc in next 6 sc, dec* around. (35)
3: *sc in next 5 sc, dec* around. (30)
4: *sc in next 4 sc, dec* around. (25)
5: *sc in next 3 sc, dec* around. (20)
6: *sc in next 2 sc, dec* around. (15)
7: *sc in next sc, dec* around. (10)
8: dec around. (5)
Bind off leaving a long tail. Do not stuff yet. Do not sew any holes together yet.
Now, you will be working in the stitches left over from the points.
Face/neck area.
1: Sc in the remaining 8 sc of each point. (40)
2: *inc in next sc, sc in next 9 sc* around. (44)
3: sc in next 6 sc, *inc, sc in next 10 sc* 3 times, Inc, sc in last 4 sc. (48)
4-5: sc around. (48)
Bind off leaving a very long tail to sew head to body.
Stuff the head lightly.
Begin sewing the head to the body so one of the points is centered over the “Cluster B”. (I used a whipstitch.)
When you only have about 10 stitches left to sew together, stuff the rest of the head and body. Make the shape egg-like.
Finish sewing the head on.
Remember how we have the 6 different holes? We’re going to use them to finalize the shape. Use a stuffing tool, pencil, or chopstick to finish stuffing the body.
Using the tails left over, sew all of the holes closed.
Assembly.
Use a small amount of black yarn, and embroider a line to separate the 2 toes on each foot.
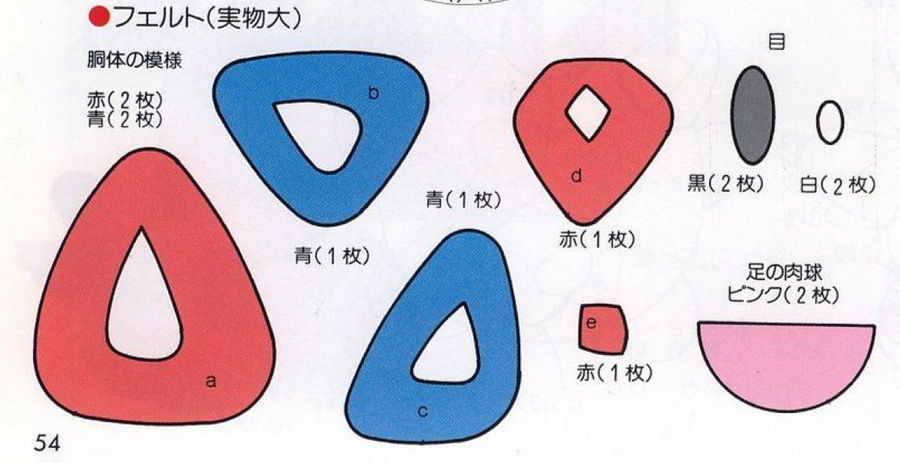
If you used felt, cut out felt shapes using the templates provided.
Cut 2 of A in red, 2 of A in blue, 1 B in blue, 1 C in blue, 1 D in red, 1 E in red, 2 Ovals in black, 2 smaller ovals in white, and 2 “D” shapes in peach.
If you want to embroider the plush like I did do so now.
Do so in this order.
Eyes (pupils, lines, and catchlights.)
Red triangles and square-ish shapes.
Blue triangles
Soles of feet
Sew the feet to the underside of the shell to the plush will stand on its own.
Sew the arms on opposite sides of the shell.
Weave in all ends.
Pattern is © of Nintendo, 1999.
Translation is © of Taikxo.
<3 Enjoy.
Link to finished plush~ [link]
Sorryfor how quite it is. My video mic did not want to co-operate.
Crochet Togepi Pattern
Translated by Taikxo
Materials:
White worsted weight yarn
Tan worsted weight yarn
Small amount of black yarn
Small amount of red yarn (or red felt)
Small amount of blue yarn (or blue felt)
Small amount of black felt (optional for eyes)
Small amount of peach yarn (or peach felt)
Yarn needle
Stuffing
The number on the left refers to round, or row when applicable. The number at the end of each set of instructions is the total number of stitches at the end of the row.
Using a tan colored yarn.
Arms, Make 2.
Start with a magic ring.
1: 4sc in magic ring. (4)
2: inc in each stitch around. (8)
3: sc around. (8)
4: *inc, sc in next* around. (12)
Body.
Using white.
Start with magic ring.
1: 6 sc in magic ring. (6)
2: inc around (12)
3: *inc, sc in next* around (18)
4: *inc, sc in next 2 sc* around (24)
5: sc in next 2, *inc in next, sc in next 3* 6 times, sc in last stitch. (30)
6: *sc in next 4, inc* around (36)
7: *inc, sc in next 5* around. (42)
8: sc in next 2 *inc, sc in next 6* around, sc in last 4 sc. (48)
9: sc in next 4 *inc, sc in next 7* around, sc in last 3 sc. (54)
10: sc around. (54)
11: sc in next 6, *inc, sc in next 8* around, sc in last 2. (60)
12-17: sc around. (60)
18: *sc in next 13, dec* around (56)
19: *sc in next 5, dec* around (48)
Change to tan
20: Working in Back Loops Only, sc around. (48) Bind off.
Edging:
Using white, join yarn at the end of row 19.
Work in Front Loops Only.
Work 3 “cluster A”s, then work 1 “Cluster B”, then work the rest of the row in “Cluster A”
“Cluster A”
Slip Stitch in next sc, sc in next sc, hdc in next sc, *dc chain 1, dc* in next stitch, hdc in next sc, sc in next sc.
“Cluster B”
Slip stitch in next sc, chain 1, hdc in next stitch, chain 1, slip stitch in chain, hdc in next sc, *hdc chain 1, slip stitch in chain, hdc* in next sc, hdc in next sc, chain 1, slip stitch in chain, hdc in next sc, chain 1.
Stuff as much as possible.
Feet
Using Tan, make 2.
Start with Magic Circle.
1: 6 sc in magic ring. (6)
2: *sc in next, inc in next, sc in next* around. (8)
3: sc in next 2 sc, inc, sc in next 3 sc, inc, sc in last sc. (10)
4: sc in next 3 sc, inc, sc in next 4, inc, sc in last sc. (12)
5-7: sc around. (12)
Begin stuffing
8: dec around. (6)
Bind off and add any more stuffing needed to fill out shape.
Now, from hear on out, it gets very tricky and confusing. So read the pattern carefully!
Crown Points.
Using tan, make 5.
On the 5th one, DO NOT BIND OFF.
Start with a magic circle.
1: 6sc in magic circle. (6)
2: sc in next, inc, sc in next 2, inc, sc in last sc. (8)
3: sc in next 2 sc, inc, sc in next 3 sc, inc, sc in last sc. (10)
4: sc in next 3 sc, inc, sc in next 4 sc, inc, sc in last sc. (12)
5: sc in next 4 sc, inc, sc in next 5 sc, inc, sc in last sc. (14)
6: sc in next 5 sc, inc, sc in next 6 sc, inc, sc in last sc. (16)
Bind off leaving a few inches of yarn to sew holes together.
Stuff.
DOUBLE CHECK AND COUNT HOW MANY STITCHES ARE IN EACH POINT.
There MUST be 16.
Crown of the head.
Sc in next 8 sc.
*sc in first 8 sc of point* 4 more times. You want to leave the long end close to where the points meet. There WILL be holes there, and you need to sew them up.
(40)
2: *sc in next 6 sc, dec* around. (35)
3: *sc in next 5 sc, dec* around. (30)
4: *sc in next 4 sc, dec* around. (25)
5: *sc in next 3 sc, dec* around. (20)
6: *sc in next 2 sc, dec* around. (15)
7: *sc in next sc, dec* around. (10)
8: dec around. (5)
Bind off leaving a long tail. Do not stuff yet. Do not sew any holes together yet.
Now, you will be working in the stitches left over from the points.
Face/neck area.
1: Sc in the remaining 8 sc of each point. (40)
2: *inc in next sc, sc in next 9 sc* around. (44)
3: sc in next 6 sc, *inc, sc in next 10 sc* 3 times, Inc, sc in last 4 sc. (48)
4-5: sc around. (48)
Bind off leaving a very long tail to sew head to body.
Stuff the head lightly.
Begin sewing the head to the body so one of the points is centered over the “Cluster B”. (I used a whipstitch.)
When you only have about 10 stitches left to sew together, stuff the rest of the head and body. Make the shape egg-like.
Finish sewing the head on.
Remember how we have the 6 different holes? We’re going to use them to finalize the shape. Use a stuffing tool, pencil, or chopstick to finish stuffing the body.
Using the tails left over, sew all of the holes closed.
Assembly.
Use a small amount of black yarn, and embroider a line to separate the 2 toes on each foot.
If you used felt, cut out felt shapes using the templates provided.
Cut 2 of A in red, 2 of A in blue, 1 B in blue, 1 C in blue, 1 D in red, 1 E in red, 2 Ovals in black, 2 smaller ovals in white, and 2 “D” shapes in peach.
If you want to embroider the plush like I did do so now.
Do so in this order.
Eyes (pupils, lines, and catchlights.)
Red triangles and square-ish shapes.
Blue triangles
Soles of feet
Sew the feet to the underside of the shell to the plush will stand on its own.
Sew the arms on opposite sides of the shell.
Weave in all ends.
Pattern is © of Nintendo, 1999.
Translation is © of Taikxo.
Image size
1194x613px 1.23 MB
© 2012 - 2024 Taikxo
Comments46
Join the community to add your comment. Already a deviant? Log In
Thank you Thank you Thank you Thank you Thank you Thank you Thank you Thank you Thank you Thank you Thank you Thank you Thank you Thank you Thank you Thank you Thank you Thank you